Twin-stick shooters have been a staple of the gaming world since the late 90s, offering fast-paced…
Tag: crypto
IS SPACEPEARL_ETH A SCAM? THE ANSWER LIES IN ITS OUTRAGEOUS PROMISES
Web 3 is full of fun and exciting games that can provide hours of entertainment. Unfortunately,…
How To Bridge Your Assets To Arbitrum
Why Gas Fees Matter in Blockchain Transactions
Gas fees are the lifeblood of blockchain transactions, enabling the computational fuel that drives the process. Fees represent the cost of a transaction and are paid to the miners who facilitate it. Without gas fees, users become the product, as is the case with Web2 applications that rely on implicit data collection. In contrast, Web3 empowers users by introducing gas fees as a means of achieving greater online autonomy. While essential to crypto networks, high gas fees pose a significant barrier to adoption, prompting the development of L2 networks like Arbitrum.
How to connect your MetaMask wallet to Arbirtrum
Arbitrum is a pioneering Layer 2 (L2) solution for Ethereum, boasting over 3 million processed transactions and approximately 2.5B locked assets. By relying on Ethereum’s Layer 1 (L1) security, Arbitrum ensures secure transactions while offering lower gas fees. The use of optimistic rollups is the key factor in reducing gas fees on Arbitrum. Optimistic rollups bundle transactions into smart contracts, using less computation and thereby minimizing gas fees for faster and more cost-effective transactions.
To give Arbitrum a try, start by adding the network to your MetaMask wallet in three simple steps.
1. Open MetaMask and click on “Ethereum Mainnet” at the top.
Then, select “Custom RPC.”

Great job! You have successfully linked your MetaMask wallet to the Arbitrum network and unlocked new possibilities such as bridging your ETH and exploring exciting new dapps.
Bridging Your Assets from Ethereum to Arbitrum
To transfer your ETH from Layer 1 Ethereum to Layer 2 Arbitrum, follow these simple steps:
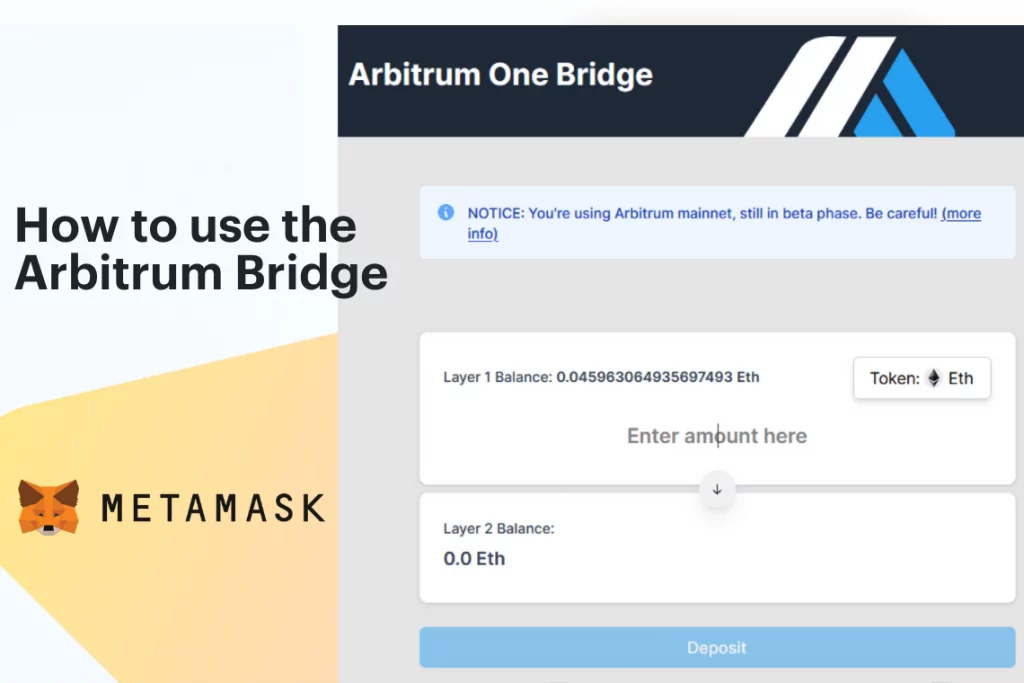
- Navigate to https://bridge.arbitrum.io/.
- As your MetaMask wallet is already connected, the screen will display the option to make a deposit, as shown below:
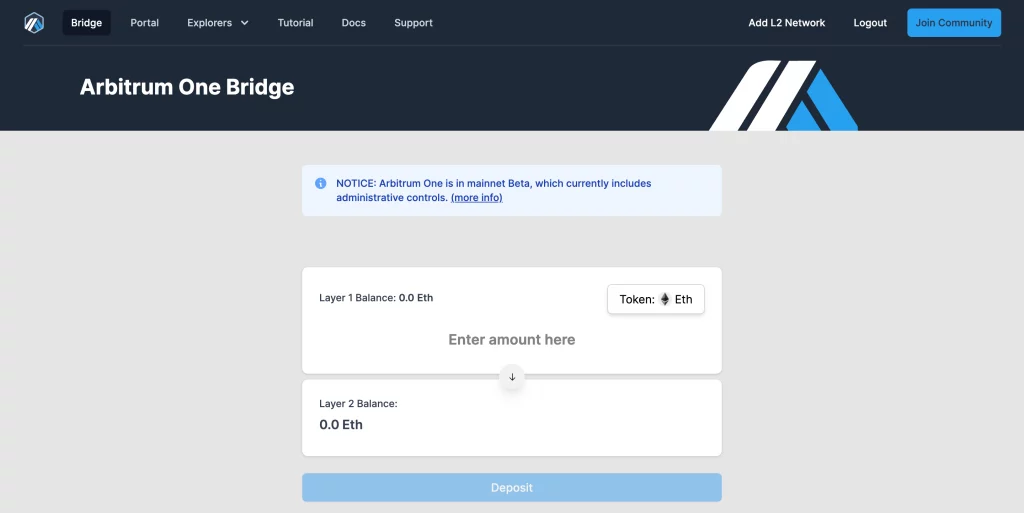
After accessing the https://bridge.arbitrum.io/ website, input the desired amount of ETH you wish to transfer to Arbitrum, and then click on the “Deposit” button to complete the transaction.
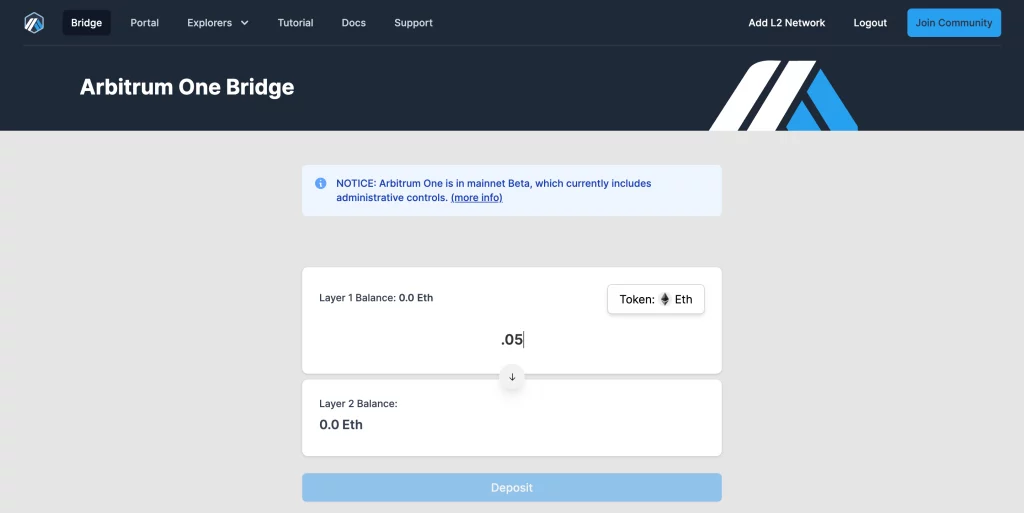
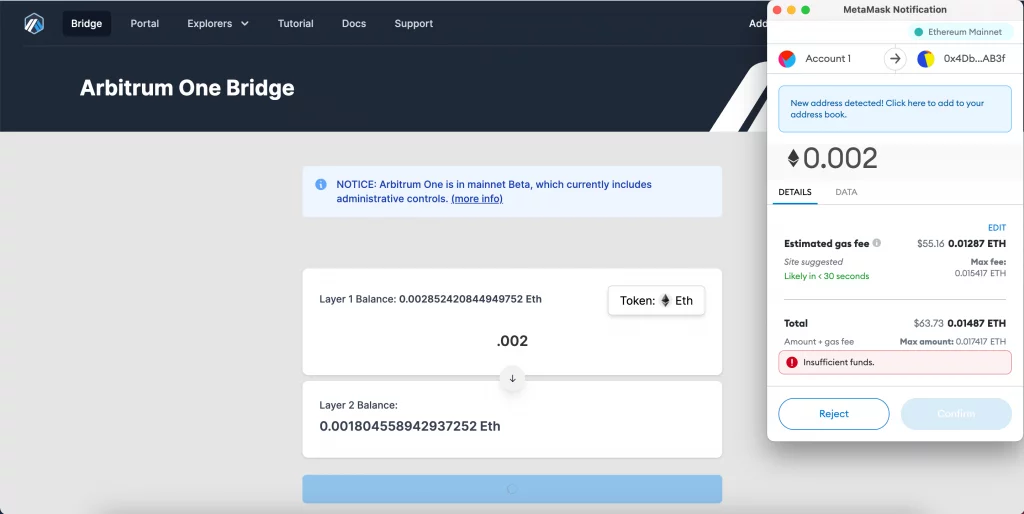
To complete the transaction, you must confirm it in your wallet. It’s important to note that this transaction is on Layer 1, and standard gas fees will be applied. However, once the ETH has been transferred to Arbitrum, you can take advantage of lower gas fees. Double-check the transaction amount, and if everything looks good, click on the “Confirm” button.
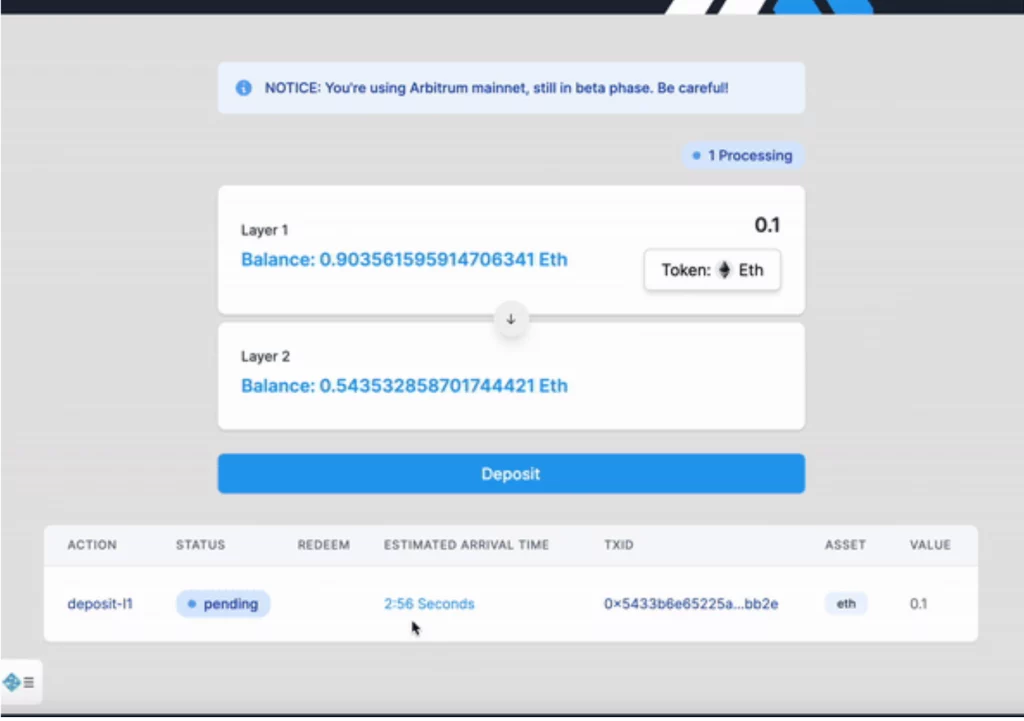
Once you have confirmed the transaction, it will be displayed at the bottom of your screen and will begin to process. This process may take several minutes to complete.
If you need further assistance with bridging your assets, you can refer to Arbitrum’s tutorial available on their website.
After successfully transferring ETH to Arbitrum, you can begin to use it on various dapps available on the Arbitrum One Portal.
Let’s now take a look at some of the many dapps that are available to you on Arbitrum.
Exploring the Wide Range of Dapps Available on Arbitrum
The Arbitrum One Portal serves as the main gateway to the Arbitrum ecosystem, offering access to over 50 of the most widely used dapps on the Web3 network. From decentralized exchanges and gaming platforms to prediction markets and lending protocols, the portal provides users with an array of options to explore and engage with. With the added benefit of low gas fees and fast transaction speeds, these dapps can be utilized in a cost-effective and efficient manner.
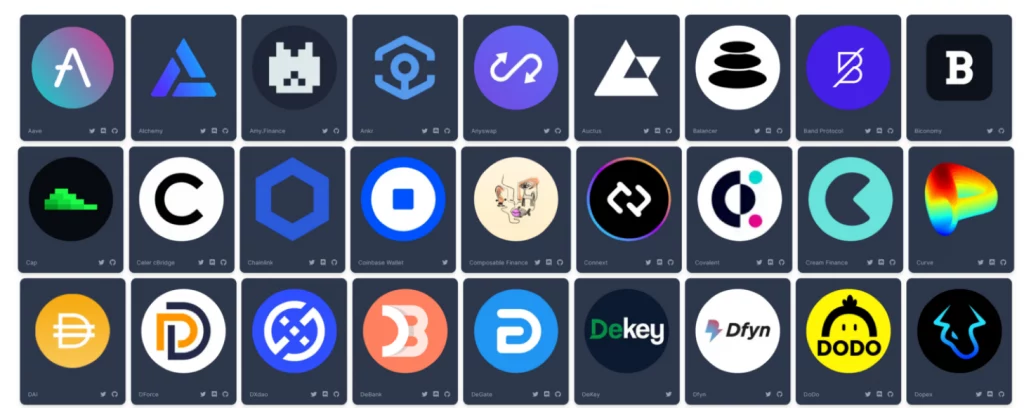
Take a closer look at what Arbitrum has to offer now that you are all set up with your MetaMask. You’ll find that many popular dapps on the mainnet such as Uniswap, Balancer, and Curve are also available on Arbitrum, as well as many others.
The real reason to bridge to Arbitrum
While there are plenty of reasons to bridge your assets to Arbitrum, one that stands out is the amazing gaming experience on TreasureDAO. Knights of the Ether, in particular, is a game worth checking out. Our review of Knights of the Ether can be seen here. So, if you’re looking for a new and exciting way to use your ETH on Arbitrum, be sure to give Knights of the Ether and the other games in the TreasureDAO ecosystem a try.
Stay tuned to TAGDesk for our upcoming in depth look at the TreasureDAO ecosystem.
REIGN OF TERROR: A PROMISING TURN-BASED STRATEGY GAME WITH A FREE DEMO
As a fan of turn-based strategy games, I was eager to try out Reign of Terror…
TEARING SPACES: A NEW MOBA CONTENDER WITH ESPORTS POTENTIAL AND A FREE MINT ON THE HORIZON
As a dedicated fan of MOBA games, I couldn’t resist checking out Tearing Spaces, the latest…
SPLINTERFORGE EARLY GAMEPLAY GUIDE
Enter The Forge and Get Started Continuing from our previous tutorials on creating a Hive account…
How to Create a Binance Account
At TAGDesk, we don’t endorse any particular centralized or decentralized exchange. We strongly recommend that you hold your cryptocurrencies in your own wallet. However, there may be occasions when you need to use an exchange, such as exchanging currencies for gaming or converting tournament rewards to fiat currency. Keeping this in mind, here’s a step-by-step guide on how to register on Binance:
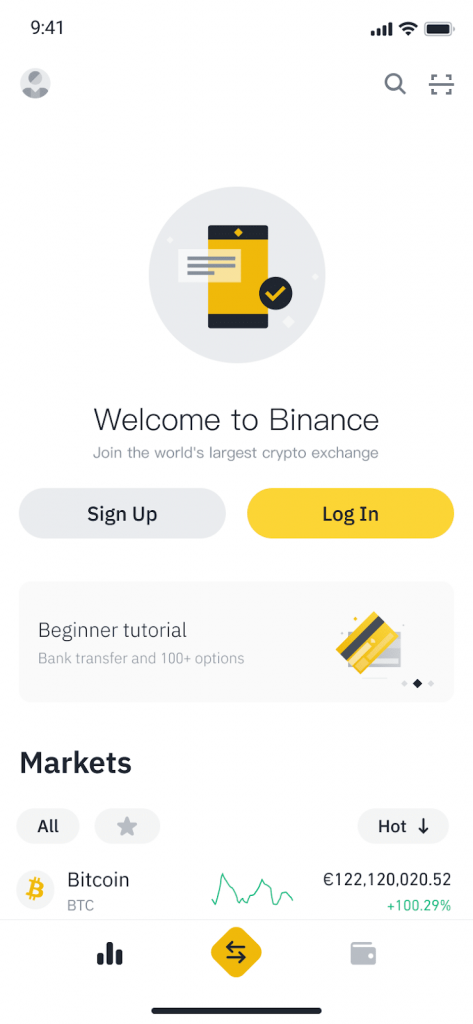
1. To begin the registration process on Binance, open the Binance app and tap on the “Sign Up” button.
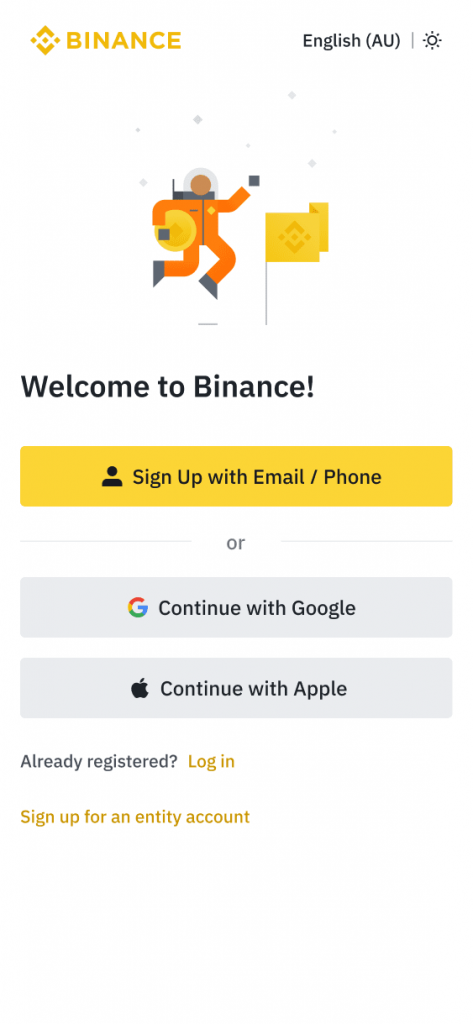
2. After tapping on “Sign Up”, you will be prompted to select a registration method. Binance offers several options, including signing up with your email address, phone number, or using your Apple or Google account. Choose the registration method that you prefer.
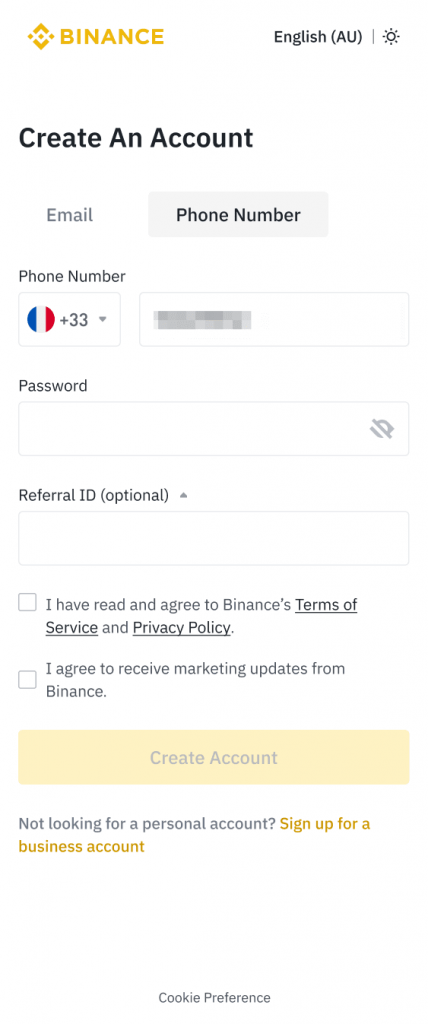
3. Next, select either “Email” or “Phone Number” as your preferred method of registration. Enter your email address or phone number and create a strong password for your account. Keep in mind that your password should be at least 8 characters long and include one uppercase letter and one number.
If you were referred to Binance by a friend, you can enter their Referral ID (optional) during the registration process.
Read and agree to Binance’s Terms of Service and Privacy Policy, and then tap on “Create Account”.

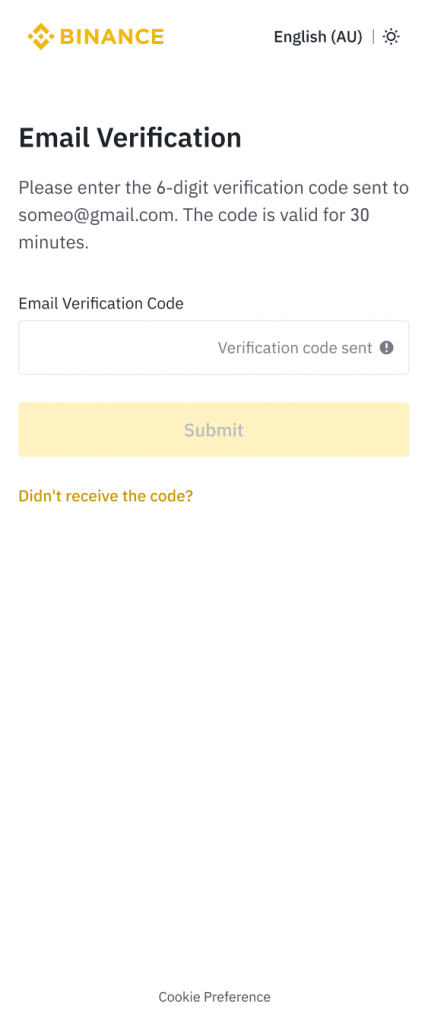
4. After creating your account on Binance, you will receive a 6-digit verification code via email or phone, depending on the registration method you chose. Enter the code within 30 minutes and tap on “Submit”.
5. Congratulations! You have now successfully registered and created your Binance account.
After creating an account on Binance, users may still need to go through a KYC (Know Your Customer) process to fully utilize the platform’s features. KYC is a standard process used by financial institutions and regulated cryptocurrency exchanges to verify the identity of their users. The purpose of this process is to prevent fraud, money laundering, and other illegal activities. KYC may involve submitting personal information, such as a government-issued ID or passport, and sometimes even a selfie for facial recognition. Once you’ve completed the KYC process on Binance, you’ll be able to deposit, withdraw, and trade larger amounts of cryptocurrencies.
SPLINTERFORGE: INTRODUCING A NEW GAME THAT LETS YOU UTILIZE YOUR SPLINTERLANDS CARDS
SplinterForge is a new game on hive, that utilizes the same cards you are currently using…
IF P2E IS DEAD WHAT SHOULD THE GUILDS DO?
It’s true that the term “play-to-earn” (P2E) may not be as widely used as it was…
OATH OF PEAK LAUNCHES!
Oath of Peak is a massively multiplayer online role-playing game (MMORPG) developed by Yeeha Games. The…